imgaugでbounding boxを表示
はじめに
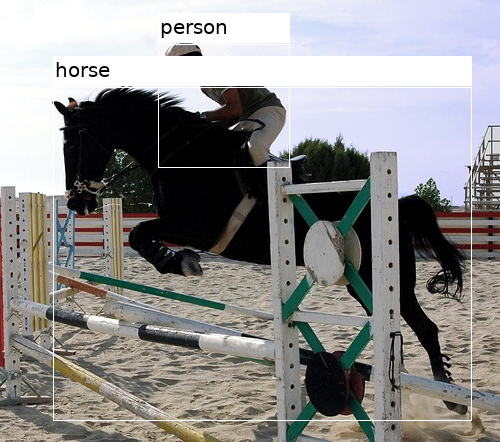
物体検出では、物体の位置を表示する方法として、検出した物体を矩形(bounding box、バウンディングボックス)で囲む方法がある。 そのbounding boxを表示する方法として、imgaugというライブラリを使って表示することができるので試してみた。
imgaugとは
画像拡張用のpythonライブラリ
画像にノイズを加えたり、クロップしたりなどできる。 その中にbounding box表示用の関数もある。
リンク
bounding boxの表示
使用ライブラリのバージョン
- torchvision: 0.5.0
- imgaug: 0.4.0
データの用意
画像とbounding boxの位置の情報を用意する。今回は、torchvisionのクラスを使い、Pascal VOCのデータセットを使用した。 Pascal VOCでは、bounding boxは左上の頂点と右下の頂点の座標で表されている。
画像(image)とアノテーション情報(annotation)を取得した。
アノテーション情報の中に、複数の物体の情報がはいっており、物体の名前とbounding boxの位置が含まれている。
import torchvision

voc_dataset=torchvision.datasets.VOCDetection(root="VOCDetection/2012",year="2012",image_set="train",download=True)

image,target=voc_dataset[0]
annotation=target["annotation"]
画像を表示してみる。
from IPython.display import display

display(image)

物体の情報を表示してみる。
print(annotation["object"])
[{'name': 'horse', 'pose': 'Left', 'truncated': '0', 'occluded': '1', 'bndbox': {'xmin': '53', 'ymin': '87', 'xmax': '471', 'ymax': '420'}, 'difficult': '0'}, {'name': 'person', 'pose': 'Unspecified', 'truncated': '1', 'occluded': '0', 'bndbox': {'xmin': '158', 'ymin': '44', 'xmax': '289', 'ymax': '167'}, 'difficult': '0'}]
2つの物体(horseとperson)があり、それぞれbounding boxの情報(bndbox)をもっている。bounding boxの情報は左上の頂点の座標のxminとymin、右下の頂点の座標のxmaxとymaxで表されている。
このbounding boxを画像上に表示してみる。
bounding boxの描画
アノテーション情報から物体の名前(obj["name"])、bounding boxの位置情報(xmin、ymin、xmax、ymax)を取り出す。
bb=BoundingBox(x1=xmin,y1=ymin,x2=xmax,y2=ymax,label=obj["name"])で描画用のbounding boxを作成する。
引数はx1,y1,x2,y2で左上の座標(x1,y1)と右下の座標(x2,y2)を指定する。
引数のlabelに表示したい名前を入れることもできる。
それをlist形式で、bb_listに保存する。
BoundingBoxesOnImage()で複数のbounding boxをまとめたものを作り、draw_on_image()で画像に対してbounding boxを付け加えた画像を生成する。
BoundingBoxesOnImage()の引数のshapeでは、(height,width,channel)の順の画像のshapeを入力する。
draw_on_image()での返り値は、ndarrayの画像なので表示するためにPILの画像に変換して表示した。
from imgaug.augmentables.bbs import BoundingBox,BoundingBoxesOnImage
from PIL import Image

bb_list=[]
for obj in annotation["object"]:
    box=obj["bndbox"]
    xmin,ymin=float(box["xmin"]),float(box["ymin"])
    xmax,ymax=float(box["xmax"]),float(box["ymax"])

    #bounding boxを作成
    bb=BoundingBox(x1=xmin,y1=ymin,x2=xmax,y2=ymax,label=obj["name"])
    bb_list.append(bb)

image_shape=(image.height,image.width,3)

#imageにbounding boxを描画
bbs=BoundingBoxesOnImage(bb_list,shape=image_shape)
bbs_image=bbs.draw_on_image(image,color=(255,255,255))

# 表示するためにpil形式に変換して、表示する
pil_bbs_image=Image.fromarray(bbs_image)
display(pil_bbs_image)
得られた画像はきちんと、物体の周囲にbounding boxが表示され、その上側に設定した名前が表示されている。

おわりに
imgaugを使ってbounding boxを表示してみた。 ラベル付きでbounding boxを表示できる関数が手軽に使えて便利。物体ごとに色を変えたいので、 できる方法がないか調べていきたい。